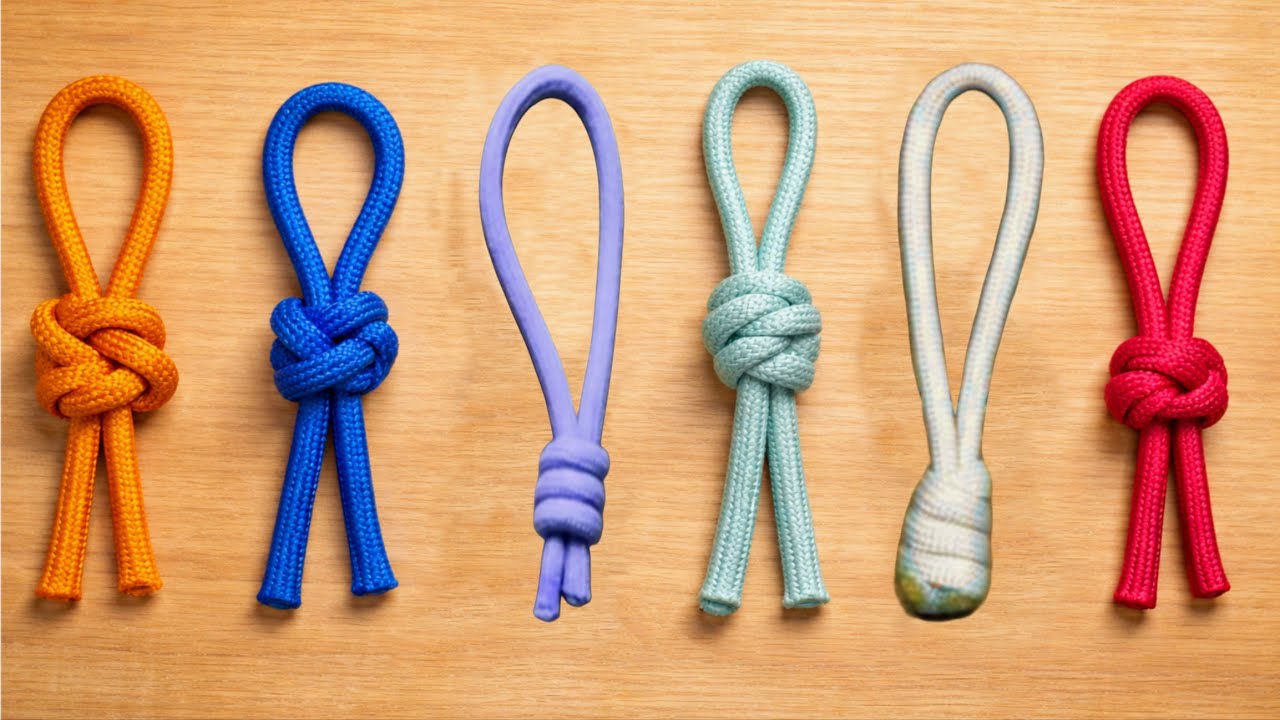
6 Easy Rope Knots for Keychains You Can Master in 10 Seconds Each!
6 Easy Rope Knots to Master for Your DIY Keychains
Introduction
Have you ever struggled with your keys getting tangled or lost in your bag? A simple yet stylish solution is to create your own keychain using basic rope knots. Whether you’re looking to jazz up your keys or add a personal touch to a gift, mastering these knots will elevate your DIY game. In this guide, you’ll discover six easy rope knots that you can learn in mere seconds and make your keychains not only functional but also fashionable. Let’s dive into the details!
Required Materials
Before starting your knot-tying journey, gather the following materials:
- Sturdy rope or paracord
- Scissors for trimming the ends
- A lighter or tape for sealing ends (optional)
- Your favorite keychain ring
Select a rope that complements your style and is easy to work with. For vibrant colors, consider using paracord, which is not only durable but also comes in various patterns. Remember to keep your workspace tidy for a smooth crafting process!
Knot Tutorials
Here are six simple knots that are perfect for crafting keychains:
1. Square Knot
This fundamental knot is perfect for securing two ends together.
- Hold one end of the rope in each hand.
- Cross the right end over the left.
- Wrap the left end around the right and pull it through.
- Repeat the steps in reverse to tighten.
2. Bowline Knot
This knot creates a fixed loop and is excellent for keychains.
- Make a small loop near the rope’s end.
- Insert the end of the rope through this loop.
- Wrap it around the main rope from behind.
- Pull the end back through the loop to secure it.
3. Clove Hitch
Perfect for attaching your keychain securely to a ring.
- Wrap the rope around the keychain ring twice.
- Cross it over itself to create an X shape.
- Pull both ends to tighten and secure the knot.
4. Double Knot
This is ideal for creating a decorative finish on your keychain.
- Start with a simple knot.
- Repeat the knot to create a double secure finish.
5. Slip Knot
A great choice for adjustable loops in your keychains.
- Make a loop with the rope.
- Feed the end of the rope through the loop.
- Pull on the standing part to tighten or loosen.
6. Figure Eight Knot
This durable knot adds flair and functionality to your keychain.
- Create a loop at the end of the rope.
- Wrap the end around the standing part.
- Bring it through the loop to finish.
Common Mistakes to Avoid
As you embark on your knot-tying journey, here are some common pitfalls to steer clear of:
- Not securing your knots tightly, which can lead to loose keychains.
- Using rope that is too flimsy, making knots difficult to hold.
- Forgetting to seal the ends of synthetic rope to prevent fraying.
FAQ
What type of rope is best for keychains?
Paracord is an excellent choice due to its durability and versatility. It’s easy to work with and comes in various colors.
How long should the rope be for a keychain?
A length of about 20-30 inches is usually enough, depending on the knots you choose and how you plan to design your keychain.
Can I customize the knots further?
Absolutely! You can add beads or charms to personalize your keychain and make it truly unique.
Conclusion
By mastering these six easy rope knots, you’re well on your way to creating unique keychains that reflect your personality. Which knot are you excited to try first? Share your thoughts in the comments below!